
There’s a special kind of magic in no-bake desserts-effortlessly whipped up, no oven required, and often dazzlingly delicious. But what happens when your creamy cheesecake stays too wobbly, your chocolate tarts refuse to firm, or your luscious mousse remains more liquid than luxe? That’s when no-bake dreams don’t quite set, turning a sweet success story into a sticky dessert disaster. Fear not-behind every soggy base or runny filling lies a fixable mistake. In this article, we unravel the mystery of why no-bake treats sometimes falter, and share expert tips and clever hacks to rescue your recipes and get your no-bake creations to set perfectly every time.
When No-Bake Dreams Don’t Set: Fixing Dessert Disasters
When no-bake dreams don’t set, it can feel like all your dessert hopes have melted away before they even had a chance to shine. No-bake desserts captivate us with their effortless charm, but achieving that perfect, firm texture requires understanding why some stalls at the finish line. Drawing from years of styling and creating flawless desserts, I’m here to reveal the secrets behind masterfully setting no-bake sweets-ensuring your creations impress at every occasion.
Prep and Cook Time
Total Time: 15 minutes prep + 4 hours chilling
Yield
Makes 8 generous servings
Difficulty Level
Easy to Medium – perfect for both beginner bakers and seasoned pros seeking quick desserts
Ingredients
- 2 cups cream cheese, softened
- 1 cup powdered sugar, sifted
- 1 cup heavy cream, chilled
- 3 tbsp gelatin powder (or agar-agar for vegetarian version)
- 1/2 cup cold water
- 1 tsp pure vanilla extract
- 1 cup crushed graham crackers or digestive biscuits
- 1/4 cup unsalted butter, melted
- Fresh berries (optional, for garnish)
Instructions
- Bloom the gelatin: Pour 3 tbsp gelatin into 1/2 cup cold water and let it sit for 5 minutes until fully absorbed and slightly swollen. This step is non-negotiable to ensure the dessert sets perfectly.
- Prepare the crust: Combine crushed crackers and melted butter in a bowl, pressing firmly into a 9-inch springform pan’s base. Chill for at least 30 minutes to create a solid foundation.
- Heat the gelatin mixture: Gently warm the bloomed gelatin over a double boiler or microwave for 10-15 seconds until fully dissolved but not boiling. Immediately stir in vanilla extract.
- Whip the cream: Using an electric mixer, beat the heavy cream until stiff peaks form-this adds lightness and volume to your dessert.
- Mix the cream cheese and sugar: Beat softened cream cheese with powdered sugar until smooth and creamy, then slowly fold in the dissolved gelatin ensuring no lumps remain.
- Combine all: Gently fold the whipped cream into the cream cheese mixture, preserving its airy texture.
- Assemble: Pour the filling over the chilled crust, smoothing the top with an offset spatula. Cover with plastic wrap and refrigerate for a minimum of 4 hours, ideally overnight for best firmness.
- Serve: Decorate with fresh berries or zest for a visually stunning finish just before slicing.
Tips for Success: When No-Bake Dreams Don’t Set, Follow These Pro Tips
- Select your gelatin carefully. Powdered gelatin gives consistent results, but if using sheets, follow equivalent blooming instructions precisely.
- Never skip blooming gelatin. Directly adding gelatin powder to liquid ingredients without blooming is the #1 culprit behind desserts failing to set.
- Prioritize chilling time. Patience is key; cutting into your cheesecake before 4 hours often leaves the texture runny and disappointing.
- Use full-fat dairy. Lower-fat alternatives lack binding fat, leading to weaker structures.
- For vegan or vegetarian options, agar-agar is less forgiving. Follow package instructions strictly, and know it sets at room temperature but firms when refrigerated, though the texture differs.
- If runny: Try briefly warming and redissolving gelatin and gently folding it into the dessert again; then refrigerate until firm.
- Enhance flavors: Adding lemon zest or espresso powder in moderation can elevate taste without impacting set.
Creative Tips to Rescue and Repurpose Runny Desserts
If you find no-bake dreams don’t set despite your best efforts, don’t despair-it’s the perfect opportunity to get creative. Transform a runny cheesecake base into irresistible parfait layers by spooning it over crushed cookies and fresh fruit in glasses. Freeze the mixture in popsicle molds for indulgent frozen treats. Or stir it into yogurt for an easy, creamy dip that pairs beautifully with sliced fruit or biscotti. When no-bake dreams don’t set, think texture contrast-crisp, crunchy add-ins balance luscious softness.
Serving Suggestions
Serve chilled slices alongside a dollop of freshly whipped cream and a scattering of fresh raspberries or edible flowers for a vibrant visual pop. A drizzle of raspberry coulis or melted dark chocolate enhances flavor depth and elegance. Pair with a bright, aromatic tea or sparkling wine to elevate your dessert moment.
| Nutrient | Per Serving |
|---|---|
| Calories | 320 kcal |
| Protein | 5 g |
| Carbohydrates | 18 g |
| Fat | 26 g |
For a deeper dive into no-bake dessert techniques, check out our detailed guide on Perfect No-Bake Cheesecake Techniques. For gelatin and its science, the USDA’s food safety guidelines offer trusted, authoritative insight.

Q&A
Q&A: When No-Bake Dreams Don’t Set – Fixing Dessert Disasters
Q1: Why didn’t my no-bake dessert set properly?
A1: No-bake desserts rely heavily on specific ingredients like gelatin, agar-agar, or chilled fats to solidify. If your dessert is weeping, wobbly, or staying liquidy, it could be due to insufficient setting agents, improperly dissolved gelatin, too much liquid, or not enough chilling time. Temperature and ingredient ratios are your no-bake dessert’s best friends-when they’re off, the dessert goes rogue.
Q2: Can I save a no-bake dessert that’s too runny?
A2: Absolutely! First, try refrigerating it longer-sometimes desserts just need time to do their thing. If time isn’t your ally, gently whisk in more dissolved gelatin or a setting agent compatible with your recipe. For creamy mousses or cheesecakes, chilling with an added layer of whipped cream or crumbled biscuits can give structure. Just be mindful: avoid stirring vigorously once set to prevent collapsing.
Q3: How do I properly dissolve gelatin for no-bake recipes?
A3: Gelatin is the magic behind many no-bake sets-it needs respect! Sprinkle powdered gelatin evenly over a cool liquid to “bloom” for 5 minutes. Then, warm gently (do not boil) until fully dissolved and smooth. Adding hot gelatin to cold mixtures can cause lumps or uneven setting, so temper your gelatin by mixing a bit of the cold mixture into the warm gelatin before combining everything.
Q4: What about vegan or vegetarian alternatives for thickening?
A4: Gelatin aside, agar-agar is a fantastic plant-based substitute. It requires boiling to activate, sets firmer and faster, and can be tricky with dairy-so experiment with your ratios! Other options include pectin, carrageenan, or blended chia seeds for natural thickening. Just remember, these alternatives often set differently than gelatin, so texture and timing will vary.
Q5: How can I prevent no-bake desserts from weeping or releasing liquid?
A5: Weeping happens when the dessert’s structure can’t hold moisture. To combat this, use fresh ingredients, avoid over-sweetening (which draws water out), and ensure your setting agents are fully activated. Adding a bit of cornstarch or cream cheese can stabilize mixtures, and always chill your dessert uncovered initially to let steam escape before covering it in the fridge.
Q6: Can temperature be the culprit?
A6: Indeed! If your kitchen is too warm or your refrigerator too cold or inefficient, no-bake desserts might struggle. Warm spots delay setting; freezing without proper structure causes ice crystals and collapse. Aim for a steady 35-40°F (2-4°C) chill and avoid opening the fridge too often while your dessert sets.
Q7: What’s the best mindset to fix your no-bake dessert mishap?
A7: Embrace the delicious learning curve! Every sticky finger and runny slip is a chance to deepen your dessert wizardry. With patience, practice, and a pinch of creativity, you’ll turn any no-bake nightmare into a dreamy treat. Remember, even kitchen failures taste better with a smile!
This Q&A offers a practical, creative guide to rescue and perfect no-bake desserts when things go awry-transforming disasters into dazzling delights.
To Wrap It Up
No-bake desserts promise sweet simplicity, but when that dreamy filling refuses to set, frustration can quickly replace the anticipation. Fortunately, a few thoughtful fixes and mindful tweaks can turn your dessert disaster into a triumph of texture and taste. Whether it’s adjusting chilling time, refining ingredient ratios, or giving your mixture a gentle nudge with gelatin or cornstarch, these solutions ensure your no-bake creations rise to the occasion every time. So next time your no-bake dream seems more like a sticky mess, remember: with a little patience and the right approach, that luscious treat is only a fix away from perfection.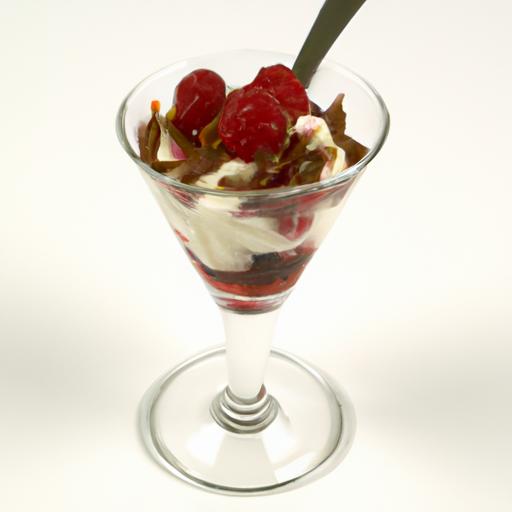


